 Legoaizer -
Help Legoaizer -
Help |
 Legoaizer -
Help
Tutorial for Bricklink
Legoaizer has a fully integrated option to use the
Bricklink database. The biggest advantage is that you can directly use colour, brick, pricing and amount available data, while you are
creating your mosaic. This way the pricing of the intended mosaic is
pretty accurate. In addition it will allow you to create a wanted list for upload
to Bricklink, and start trading on the parts right away. But first we show some
important features that enables the Bricklink interactions (see also Functions
and features): The Bricklink database
This database of colours, bricks and
prices is updated regularly, and you can update it manually by
pressing the 'Check for update'
button. Then follow the information in the table:
if an update is available the
update button will become
active. After a successful update this button will become inactive. Export Bricklink
wanted list Lesson
1: My first Bricklink colour-brick dataset
Select via
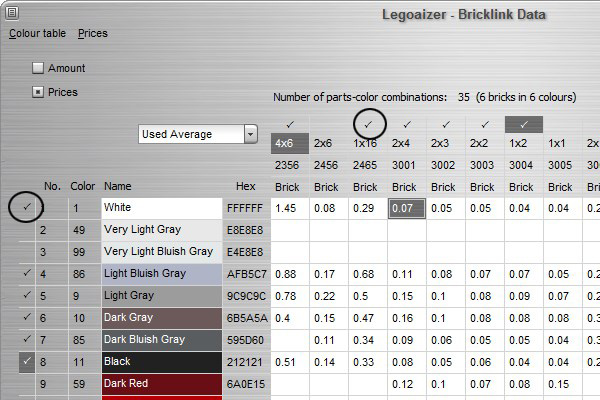
the main menu 'Bricklink' 'Bricklink colour table'. The following interface is started:
Carefully look at the table: You can now build your own Bricklink
database by checking the boxes on the left and top areas. In the example
above you can see the tickboxes in 2356, 2465 to 3004, and the colours 1,
86 to 11. In case you encounter a 'x' sign in the tickbox you can ignore this
warning (no Bricklink data is available), and still apply this brick or colour
(e.g. you have plenty of these yourself). When all
checkboxes that you want to use are done, then press the button 'Create colour table'
and provide a table name. The table is created, and is immediately active,
replacing your current table! And then you're ready to start to create
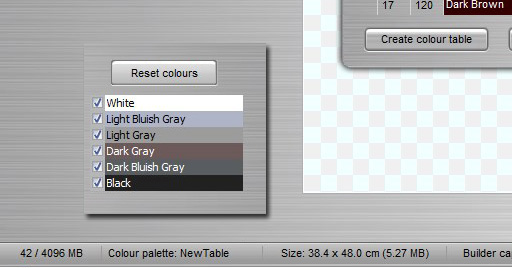
any mosaic. Picture above: the inset
shows the new colours that were selected, the table name that was provides was
'NewTable'. Lesson 2: Synchronising the dataset with your
current table
In some
cases you would like to edit your previously created Bricklink table. That is
easy: first load this table, then press the button 'Copy
from current' (don't forget to first show the Bricklink colour data: via
main menu 'Bricklink' 'Bricklink colour
table'). This way the
current table is copied in the Bricklink window. You can now do the same as
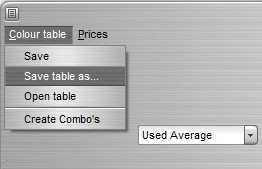
explained in lesson 1: check and uncheck bricks and colours. Then save the table
again: Lesson 3:
Synchronising the current table with the current dataset
Alternatively, in other cases you wish to copy the selected
checkbox-brick combinations of the Bricklink table to your current dataset. This
would be the same as lesson 2 and then select the option 'Update table'. The button 'Copy to
current'
is exactly doing the same. It's a kind of shortcut. Lesson 4: Create a Wanted List for upload
to Bricklink
After pressing this menu option an interface is shown in which you are requested to
complete the data for the xml file (see picture below). On the left side
(not editable part) is the data that is currently available via the Bricklink
website on colours and prices. On the right side (white area) is the editable
part of the xml file.
Most data
is already filed in like requested amount, maximum price, notifications and
condition. In case you wish add a remark, you can use the still empty column. If
ready, then press the
'Create Export xml file' button. The file is stored in the same location as the mosaic
picture and spreadsheet (the 'Results folder', as in 'Folders' in the main menu). In
the top corner the associated brick is shown when you click on a row in the
editable area (here referred to as 'PartID' , basically the
Bricklink part code for that brick part).
The XML file follows the Bricklink convention and naming
of xml tags. This file is stored as 'BrickLink_WantedList.xml', in the same folder as the
results (via the main menu: 'Folders' 'Open results
folder'). The name of the wanted list file is fixed, so in case you
have a previous list, please remove or rename this list
first. Example: <?xml version="1.0"
encoding="UTF-8"?>
This pop-up window
shows the current database from the Bricklink website. The selection of bricks
is limited to the ones that are most used in mosaic creation. The corresponding
brick colours are shown, all the known combinations of brick and colour,
and for all these the new and used prices that are found in the market place of
Bricklink.com.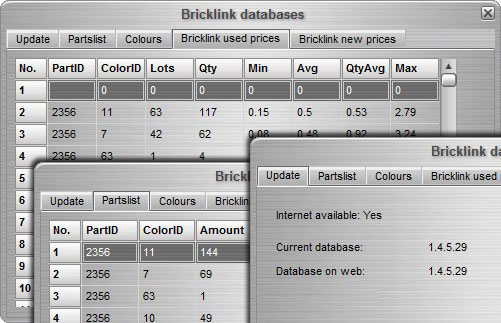
The full brick list with colour data,
price etcetera can be exported in the Bricklink xml file format. This file can
then directly be uploaded via Bricklink website as your wanted list and continue
to buy your parts via Bricklink. This will only be effective when you have
created a fully compatible Bricklink brick-colour table. In case colour and
brick codes are not recognized you will risk an error via Bricklink.


<inventory>
<item>
<itemtype>P</itemtype>
<itemid>3001</itemid>
<color>8</color>
<maxprice>0.12</maxprice>
<minqty>321</minqty>
<condition>N</condition>
<remarks/>
<notify>N</notify>
</item>
...
</inventory>
Lesson 5: Combos
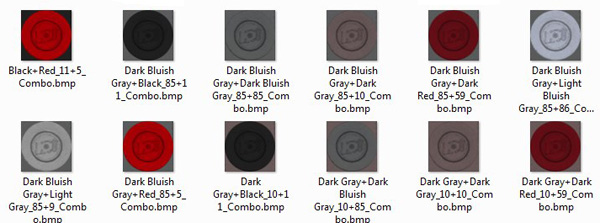
<square plate colour name>+<round plate colour name>_<square color ID>+<round colour ID>_<remark>.bmpExamples: 'Black+Light Gray_11+9_Combo.bmp' and 'Red+Red_5+5_Combo.bmp'.
In both cases (self-made pictures or computer generated combo pictures) the bricklink data can be read, but there will not be a link made between Bricklink and your files. This is only possible from libraries that are created using the Bricklink data itself (like here).
For normal Bricklink datasets the data can be read back to the Editor ('Copy from current' and 'Copy to current', see here). For Combo sets this is not possible anymore. When pressing one of these buttons nothing will happen. To edit a Combo set you need to make a new one, or use the checkboxes to include or exclude a colour.
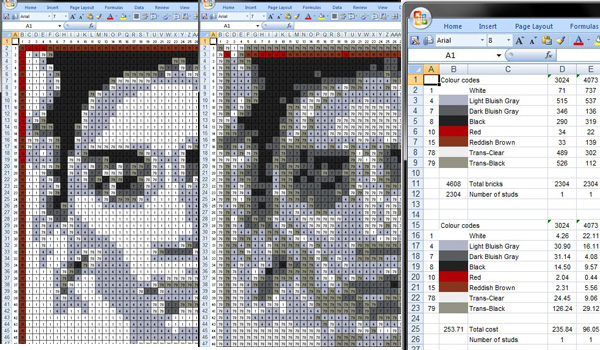
The resulting output can be saved in one blueprint file with two tabs: one for the round top bricks, the other for the underlying square bricks. If no combo dataset is detected the output remains simply one tab of blueprint data.The picture below shows the different combo results in Excel spreadsheet format. Left the round top layer; in the middle the square bottom layer; and on the right the summary for the two types of bricks ('3024' and '4073' Bricklink codes) of amount and cost.
Epilogue: What else is there to
do?
Legoaizer has basic functions available to work with Bricklink
data: